Setting up a VPNUK SMART DNS connection on Wii.
1. Registering your IP on the SmartDNS service
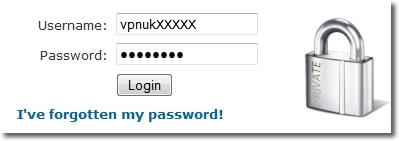
Login to the Client CP using your VPNUK login username and password.
2. Go to SmartDNS Menu
Go to the ‘VPNUK Smart DNS‘ sub menu and select ‘IP Address Check-in’.

3. Register IP
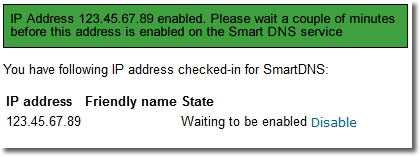
The Smart DNS system will reveal your current IP address, click onto the ‘Enable’ button, that will register your current IP address on the Smart DNS service.
IMPORTANT: If you change location, or if your IP address changes you will need to check-in the new IP. For example, if you are using wi-fi, at home, and then go to an outside location and use a wi-fi hotspot, you will need to check-in that new IP address. You will then need to check-in your home IP once you return home. Each IP address you use to access the internet has to be checked in before you can access the SmartDNS service.

4. Confirmation
The Smart DNS system will confirm your IP address has been registered, it takes just a couple of minutes become enabled on the service.
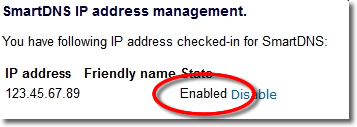
5. Registered
The Smart DNS system will confirm your IP address has been registered, it takes just a couple of minutes become enabled on the service.
6. Get SmartDNS IP
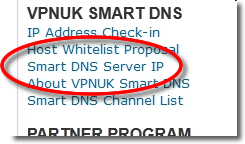
Click onto the ‘Smart DNS Server IP’ link in the menu.
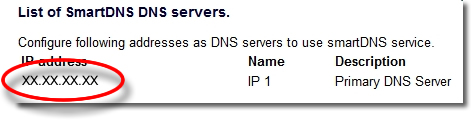
7. Copy IP
Copy or make a note of the ‘Smart DNS Server IP’ that you are to use, you will need this later in the setup.
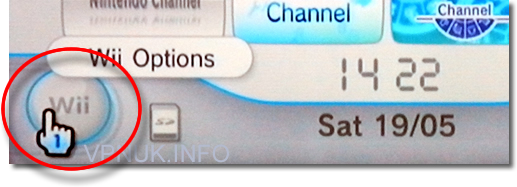
8. Wii Options
Click onto ‘Wii Options’ from the home screen.
9. Wii Settings
Click onto ‘Wii Settings’ button from the options page.

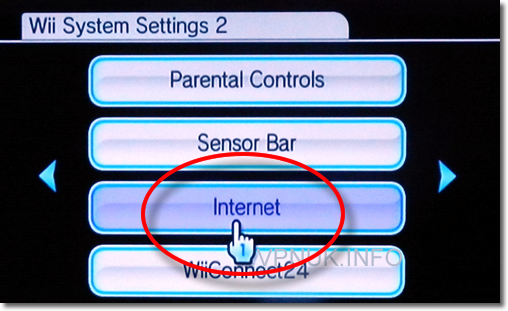
10. Internet
Click onto the button titled ‘Internet’ from the Wii Settings 2 screen.
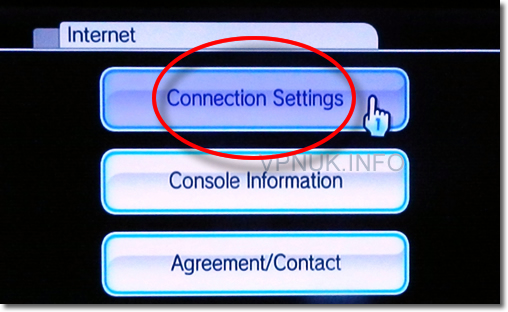
11. Connection Settings
Click onto the ‘Connection Settings’ button.
12. Connection
Click onto the connection you’d like to configure.

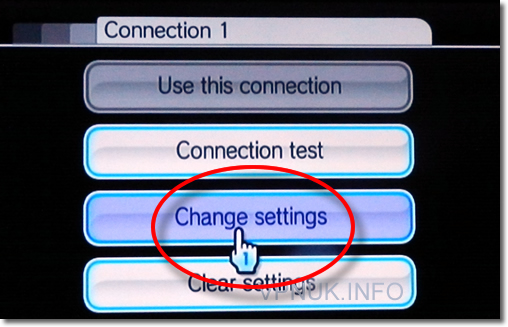
13. Wii Settings
Click onto ‘Wii Options’ from the home screen.
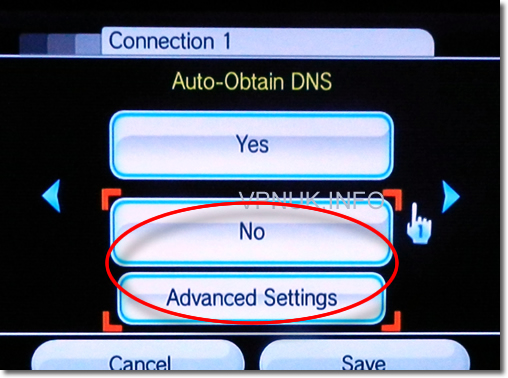
14. DNS Settings
Scroll through the settings until you come to the ‘Auto-Obtain DNS’ settings screen. Click onto the ‘No’ button followed by the ‘Advanced Settings’ button.
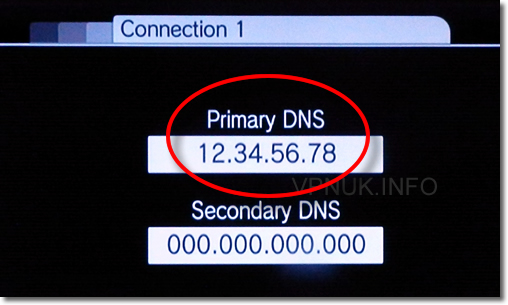
15. DNS Server
Change ‘DNS Server’ to the ‘Smart DNS server IP’. You can find these settings in the VPNUK Smart DNS section of the Client CP.
16. Auto DNS
Return to the ‘Auto-Obtain DNS’ settings screen and click onto the ‘Save’ button.
VPNUK Connection Setup Tutorial
Thats It!! In order to be sure the settings are active you should Disable/Enable the internet connection or reboot your console
Smart DNS Overview
Windows XP Setup
Windows Vista Setup
Windows 7 Setup
Windows 8 Setup
Windows 10 Setup
Mac OSX Setup
Linux Setup
Apple iPad Setup
Apple iPhone / iPod Touch Setup
Android Setup
Amazon Fire Devices Setup
Router Setup
Boxee Setup
Wii Setup
PS3 Setup
Smart TV Setup
Western Digital WDTV Setup
Raspberry Pi Setup
Apple TV Setup
Amazon Fire TV Setup
Backberry Playbook Setup
Blackberry Z10 & Q10 Setup
Chrome OS and Chromebook Setup