Windows Vista MTU Adjustments
Step One: Discover the optimal MTU size.
We will start by determining the optimal MTU for your system. You can use ping command to do so, for example, ping DOMAIN.NAME -f -l XXXX, where your VPN server is the DOMAIN.NAME you want to reach and XXXX is the packet size used to determine the optimal MTU for your system. For example, you can start with 1492 as showing here.
From the command prompt (start, search, cmd), type the following command changing DOMAIN.NAME to your VPNUK server IP:-
ping DOMAIN.NAME -f -l 1492
This will give you one of the two following results;
1. Pinging DOMAIN.NAME [DOMAIN.NAME] with 1492 bytes of data:
or
2. Packet needs to be fragmented but DF set.If you received: Packet needs to be fragmented but DF set. Change the packet size to 1482 and start again reducing the size by 10 until you receive a response similar to: Pinging DOMAIN.NAME [DOMAIN.NAME] with XXXX bytes of data. You can then take the packet size up one digit at a time until you find the optimal size.
Step Two:How to check your MTU setting.
From the command prompt (start, run, cmd), type the following command:-
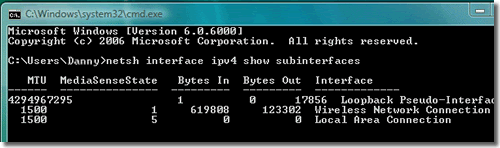
netsh interface ipv4 show subinterfaces
This will show the MTU set by vista on each network device.
As you can see from the image below that even though MTU of 1430 is set for best performance on my router, that vista still has the default windows setting of 1500 on both the wireless and ethernet network cards – this is despite the auto tuning feature that is supposed to automatically adjust the MTU figure.
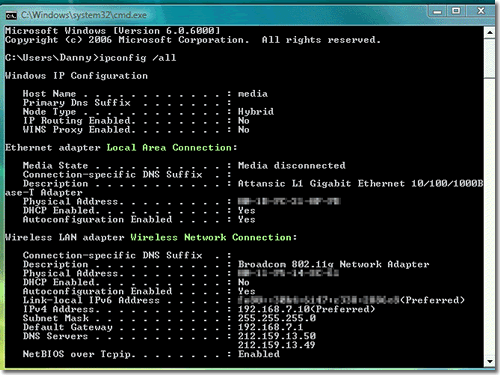
We can get more information about the attached network devices by using the command
ipconfig /all
If you are going to be changing your MTU settings make a note of the exact names of the network devices. In the example above they are the words directly after adapter and what Ive highlighted in green ie “Local Area Connection” or “Wireless Network Connection”.
Step Three: How to change your MTU setting.
First of all you can only change the MTU value with elevated privileges. Even if you have administrator privileges you will still need to run cmd as Administrator. If you miss out this step then you will get the error “The requested operation requires elevation”.
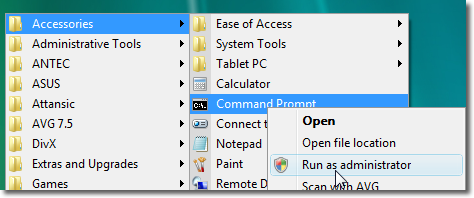
Run Cmd as Administrator
Either:
From Programs > Accessories > Command Prompt >
Right Click on Command Prompt > Select “Run as administrator”
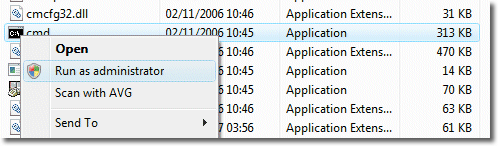
OR:
Navigate to the command prompt in C > Windows > System32
![]()
locate the cmd icon and right click.
Select “Run as administrator”.
This will open a new cmd window in which we can configure windows settings.
You should see the new cmd window is headed “Administrator” rather than your user account name.
Step Four: Setting the MTU value
Use the following command to set the MTU value:
netsh interface ipv4 set subinterface “Network Connection” mtu=XXXX store=persistent
replace “Network Connection” with the name of the network device you made a note of above, and replacing XXXX with the new MTU value.

In my example I used netsh interface ipv4 set subinterface “Wireless Network Connection” mtu=1430 store=persistent
Thats all there is to it!! You need to Reboot now.