OpenVPN and the VPNUK OpenVPN Assistant.
The following instructions go step–by–step through an OpenVPN installation on Windows Vista.
IMPORTANT: In order to avoid any software confilcts please ensure all older or alternative VPN connection software (including OpenVPN) is removed in full from your Windows system before installing our OpenVPN Assistant software.
Known OpenVPN routing issues: We do come across routing issues from OpenVPN connections from time to time, so, if you encounter any connection problems after installing OpenVPN please come over to our Live Help service and one of our expert team will assist you in resolving the issue. In order to minimise the possibility of any routing issues its important that you always run the OpenVPN program with escalated permissions in order to ensure you have no internet routing issues over your VPNUK connection.
1. Download OpenVPN Assistant
Click here to download: VPNUK OpenVPN Assistant 2.42 (.ZIP) . If you have any problems downloading or installing files from our server please contact our Live Help team, we are always available to help. Alternative download mirrors are available on our downloads page here.
![]()
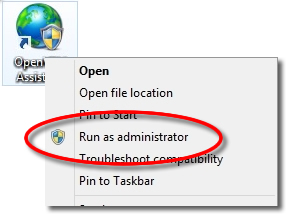
2. Run Installer
Its always a good idea to run the installer application with escalated permissions by right clicking onto the OpenVPN Assistant Installer file, then choose ‘Run as administrator’.
3. Install OpenVPN Assistant
Click ‘Next’ to initiate the installation.

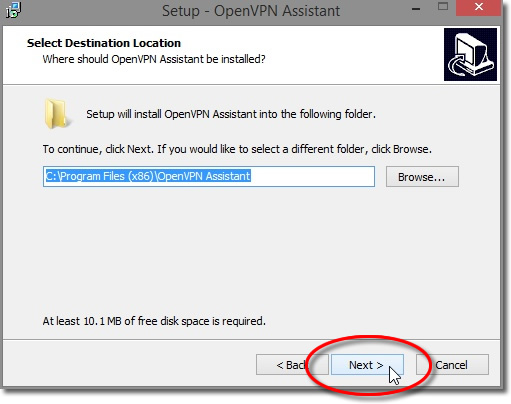
4. Installation Location
Click ‘Next’ to confirm the installation location.
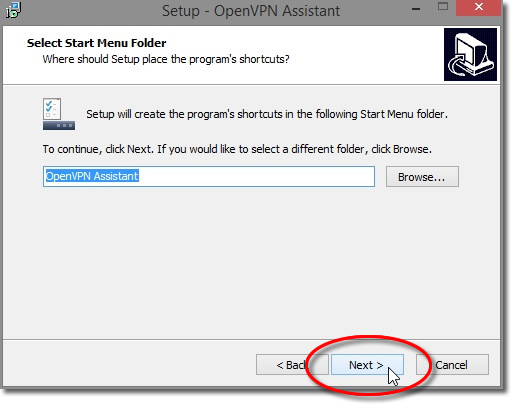
5. Software Name
Click ‘Next’ to confirm the name.
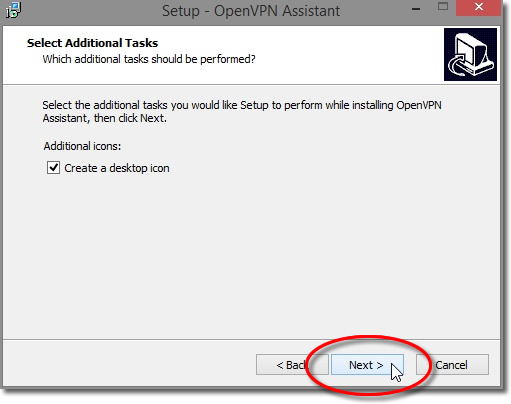
6. Create Shortcut
Place a check in the Additional Icons checkbox, this will create a desktop shortcut for easy access, then click ‘Next’.
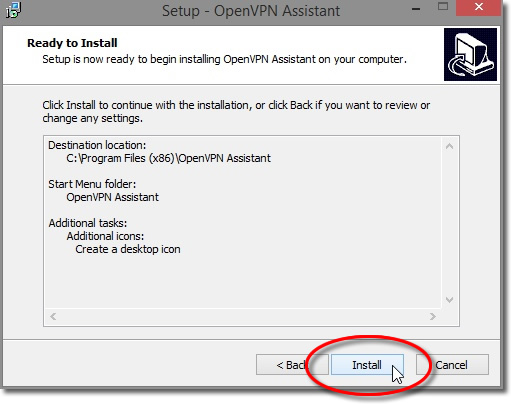
7. Install OpenVPN Assistant
Click onto the ‘Install’ button.
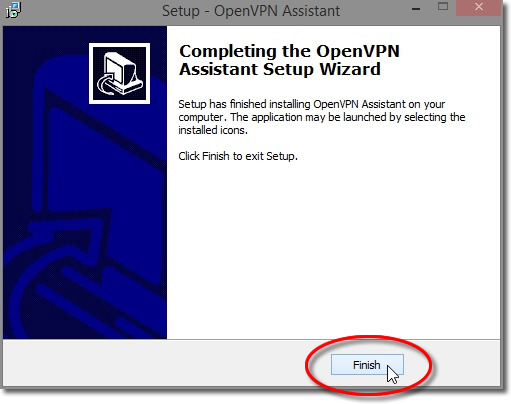
8. Finish Installation
Click onto the ‘Finish’ button. The OpenVPN Assistant software application will now be installed on your system.
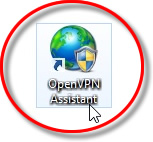
9. Open the Assistant
Double click onto the OpenVPN Assistant desktop shortcut. Again, its always a good idea to run the application with escalated permissions by right clicking onto the OpenVPN Assistant Installer file, then select ‘Properties’ from the menu, followed by the ‘Compatibility’ tab then place a check in the ‘Run this program as an administrator’ checkbox.
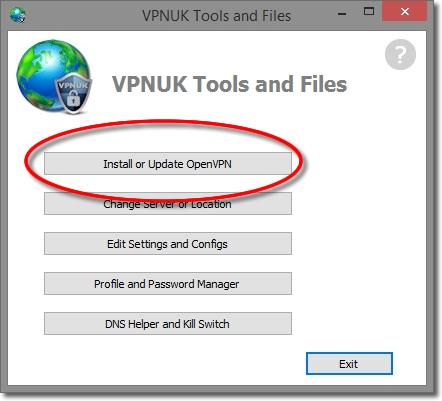
11. Install OpenVPN
Click onto the ‘Install or Update OpenVPN’ button to begin the installation of OpenVPN.
NOTE:
You should check for updates frequently by clicking onto the update button every so often to ensure you have the latest version of OpenVPN installed on your system.
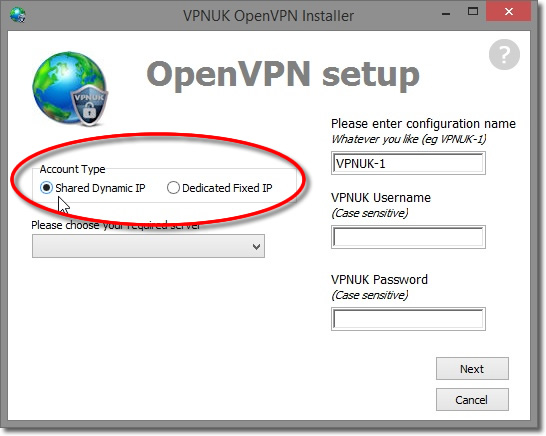
12. Configure the Connection
Choose your VPNUK ‘Account Type’.
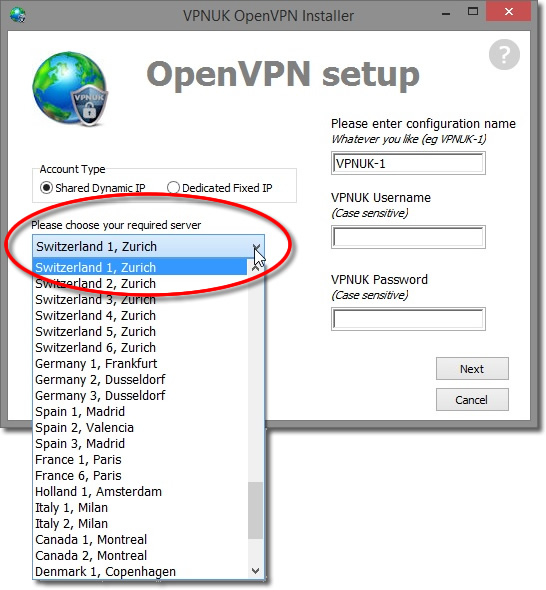
13. Select a VPN Server
Shared IP account holders are free to select any server from the list of available servers. Users on the Dedicated IP platform should choose the server their Unique IP corresponds to.
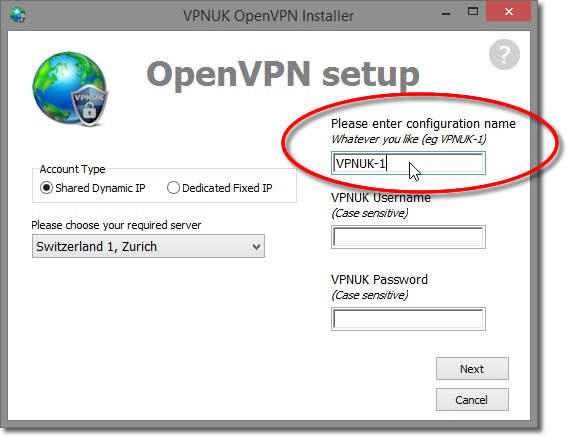
14. Friendly Name
You can enter any name into the ‘Configuration Name’ area.
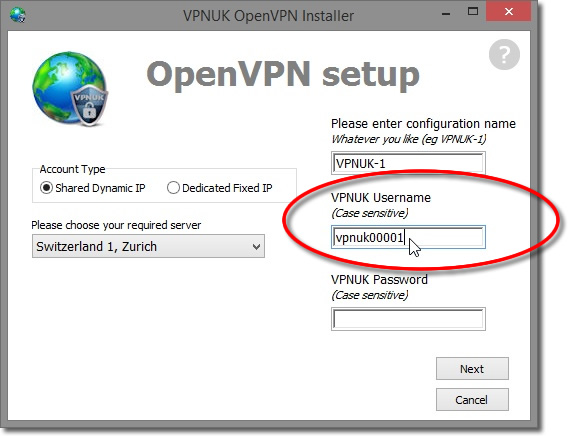
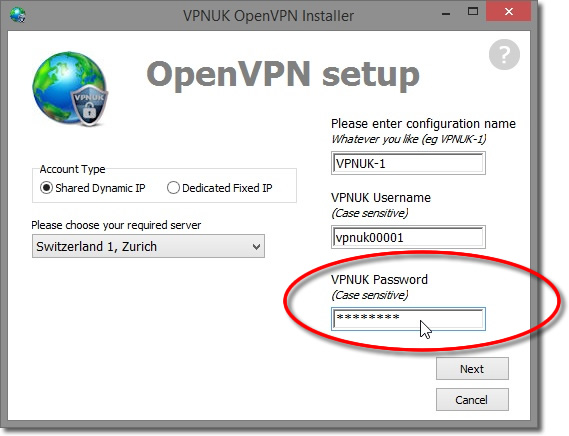
15. Login username
Enter your ‘VPNUK Username’. You can find your login credentials in your ‘Welcome to VPNUK’ email or in the ‘Members area‘ on the VPNUK website.
16. Username and Password
Enter your ‘VPNUK Password’. You can find your login credentials in your ‘Welcome to VPNUK’ email or in the ‘Members area‘ on the VPNUK website.
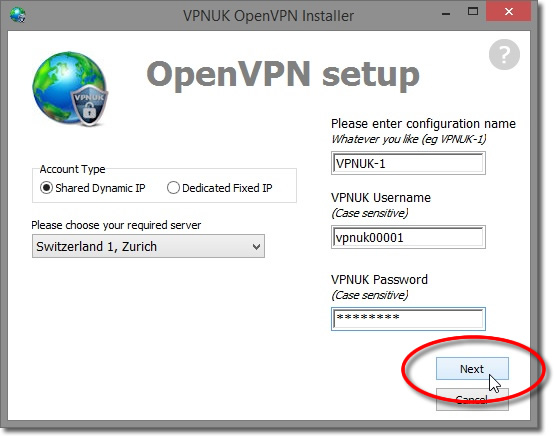
17. Finalise Configuration
Ensure all the details are correct then click the ‘Next’ button.
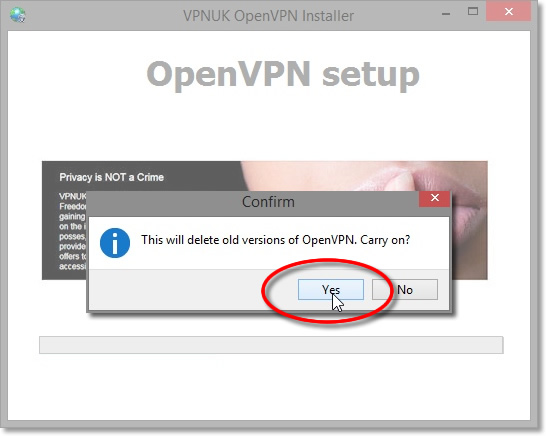
18. Previous Installation Removal
You will receive a prompt informing you that any old versions of OpenVPN will be removed from your system, if you are happy to proceed, click the ‘Yes’ button.
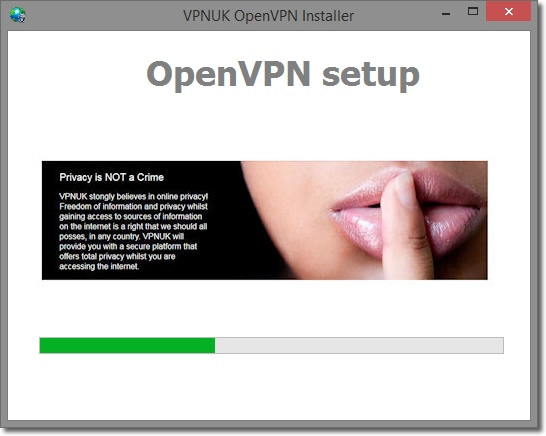
19. Installation Procedure
The OpenVPN software will now install. This will take some time so please be patient and let the installer complete the installation process. If the installer appears to stall or stop responding please do not close it, the process will complete after a few minutes.
NOTES: You may recieve a notice about installing a TAP device driver, the driver is required by OpenVPN. Please ensure you click ‘ok’ and allow it to install.
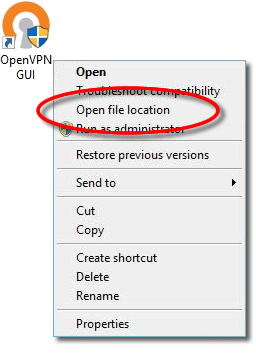
20. Setting Permissions.
OpenVPN will now be installed on your system. You should see a ‘OpenVPN GUI’ icon on your desktop. Its important that you always run the OpenVPN program with escalated permissions in order to ensure you have no routing issues. Right click onto the ‘OpenVPN GUI’ desktop shortcut and select ‘Properties’.
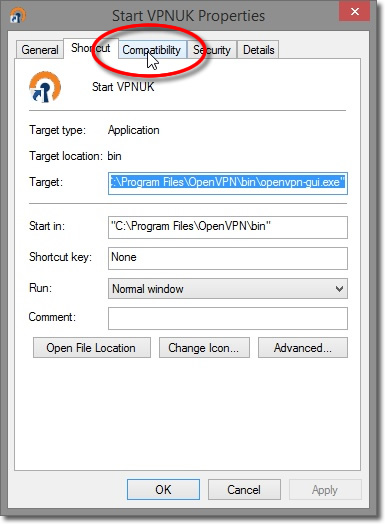
21. Compatibility.
Click onto the ‘Compatibility’ tab.
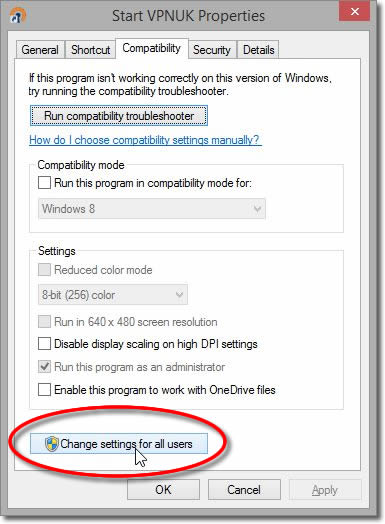
22. All Users Settings.
Click onto the ‘Change Settings for all users’
button.
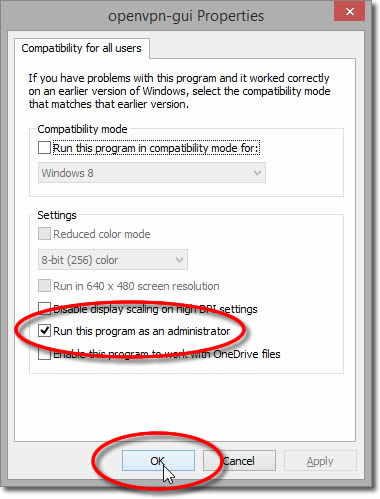
23. Administrator Permissions.
Place a check in the ‘Run this program as an administrator’ checkbox and click onto the ‘OK’ button.
24. Run the OpenVPN GUI
Before connecting to OpenVPN you have to run the GUI, in order to do this you have to click onto the ‘Open GUI’ icon which will run OpenVPN ready for connecting.

25. Connecting to VPNUK
You can now connect OpenVPN from the sys tray. Each time you open the ‘OpenVPN GUI’ its icon will appear in the sys tray (Inside the icons bay, usually on the bottom right hand side).

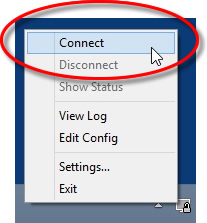
26. Connecting to VPNUK
Right click onto the OpenVPN GUI and select ‘Connect’.
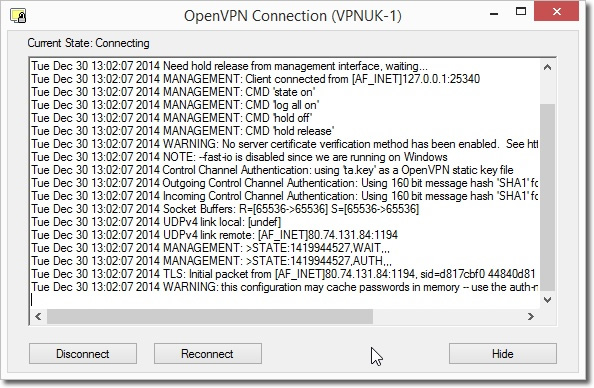
27. Connection Overview
Whilst connecting the ‘Current State’ window will pop up and display the connection process.
28. Connected!
Thats it! You will be connected once the icon turns Green.
Note: If you experience a loss of connection or any issues with routing through the VPN please check out our DNS Leak Protection tutorial here.

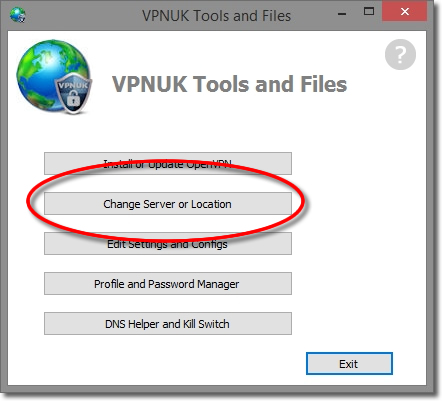
VPNUK OpenVPN Assistant Tutorial
The OpenVPN Assistant has been created to assist you with tasks associated with OpenVPN. With the help of the OpenVPN Assistant you can switch servers, switch protocols, switch ports, Route DNS, Edit MTU settings
OpenVPN Assistant Options – Update OpenVPN
1. Install OpenVPN
Click onto the ‘Install or Update OpenVPN’ button to begin the installation of OpenVPN.
NOTE:
You should check for updates frequently by clicking onto the update button every so often to ensure you have the latest version of OpenVPN installed on your system.
2. Update Options
If you are not changing any profile settings you can choose to update OpenVPN without having to re-enter any account settings.

3. Installation Procedure
The OpenVPN software will now update. This will take some time so please be patient and let the installer complete the installation process. If the installer appears to stall or stop responding please do not close it, the process will complete after a few minutes.
NOTES: You may recieve a notice about installing a new TAP device driver, the driver is required by OpenVPN. Please ensure you click ‘ok’ and allow it to install.
OpenVPN Assistant Options – Switching Servers
1. Open the Assistant
Open the OpenVPN Assistant software.
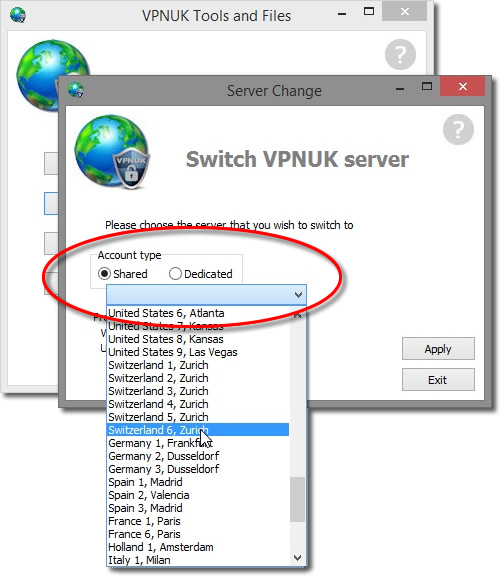
2. Changing the VPNUK Server you connect to
Users on the Shared IP platform can switch between servers at any time. In order to switch servers click onto the ‘Change OpenVPN server IP’ button.
3. Choose the server
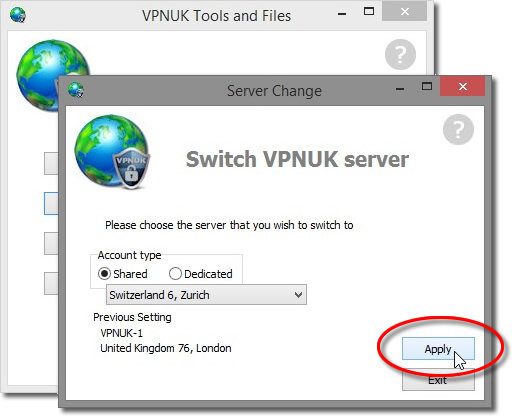
Choose your account type then and select any server.
NOTES: If your account is on the Dedicated IP platfom you should choose the server that your unique IP corresponds with.
4. Apply the change
Click onto the ‘Apply’ button.
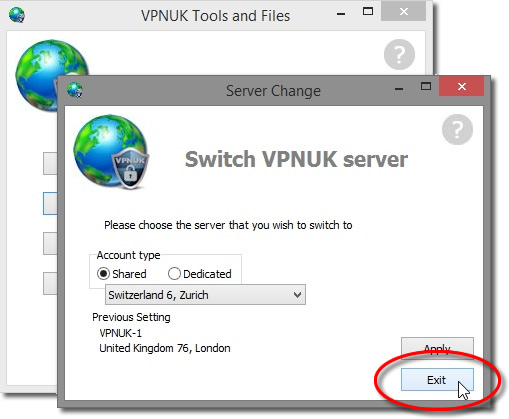
5. Exit the IP Switcher
Click onto the ‘Exit’ button.
OpenVPN Assistant Options – Editing Other Settings
1. Open the Assistant
Open the OpenVPN Assistant software.
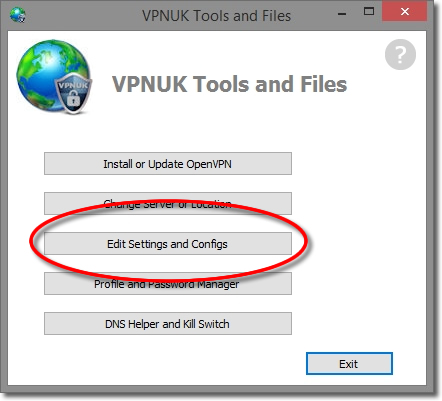
8. Change Settings and Configs
Click onto the ‘Change Settings and Configs’ button..
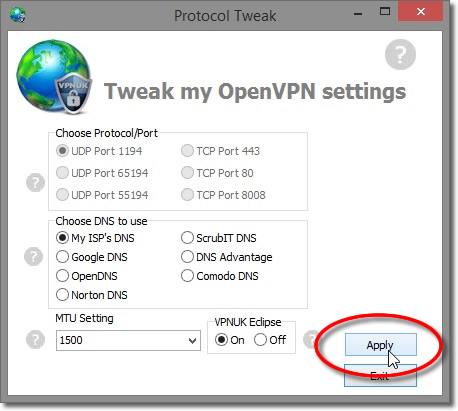
9. Select custom configuration settngs
You can now change any of the default settings to custom settings.
1. Protocol Port Settings – Changes the protocol and port used for OpenVPN connections.
2. DNS Settings – Routes the connection through an alternative DNS service.
3. MTU Changer
– Lowers the default MTU setting from 1500 to 1100.
4. VPNUK Elipse – This scrambles meta data and provides increased privacy.
Once you have applied your custom settings click onto the ‘Apply’ and ‘Exit’ button.
OpenVPN Assistant Options – Set Username & Password
1. Open the Assistant
Open the OpenVPN Assistant software.
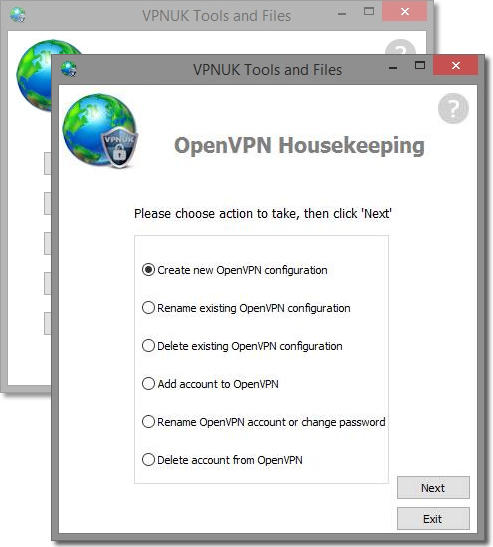
8. OpenVPN Password and Profile Manager
Click onto the ‘Profile and Password Manger’ button.

9. Using the Password and Profile Manager
You can use the Password and Profile Manager to add/remove and manage profiles that are used to connect to your VPNUK account through OpenVPN. THe options you have are as follows.
1. Create new OpenVPN configuration. This
option will assist you in adding another server profile to an existing profile.
2.
Rename existing OpenVPN configuration. This option will assist you in renaming an active profile (friendly name).
3. Delete existing OpenVPN configuration. This option will allow you to delete
an existing profile.
4. Add account to OpenVPN. This option will create a new account profile into OpenVPN. You will then be given the option of which account to connect to from the OpenVPN GUI each time you connect to the VPN.
5.
Rename OpenVPN account or change password. This option will assist you in changing your account username or password.
6. Delete account from OpenVPN. This option
will enable you to delete any unused account profiles from OpenVPN.
Troubleshooting Guide
If you receive any errors whilst connecting to OpenVPN originating from TUN/TAP failing to start you may need to try and clear your DNS and Winsock.
You should open command prompt as an administrator when applying any of the following commands.
FLUSH DNS
1. Enter: netsh interface ip delete arpcache
2. Enter: ipconfig /flushdns
3. Enter: ipconfig /renew
4. Restart your computer
If the above DNS Flush does not fix the issue you should try resetting winsock with the following command.
WINSOCK RESET
1. Enter: netsh int ip reset logfile.txt
2. Enter netsh winsock reset catalog
3. Reboot your computer
If you are still receiving TUN/TAP errors whilst connecting to OpenVPN you should try restarting DHCP Services.
RESTART DHCP SERVICES
1. Go to: services.msc
2. Scroll down to and double click:
DHCP Client
3.
Set to: Automatic
4.
Stop the service and then Start the service.
5. Reboot your computer