Setup VPNUK Software v1.2.2.
Setup VPNUK with the following setup guide. The following tutorial will go step–by–step through installing, configuring and connecting to your VPNUK account using VPNUK Connection Software on Windows. VPNUK Connection Software is currently configured with an OpenVPN connection.
IMPORTANT: In order to avoid any software conflicts, please ensure all older or alternative VPN connection software (including VPNUK Connection Assistant and OpenVPN) is removed in full from your Windows system before installing VPNUK software.
Click here to download the latest version (1.2.2) of our app from our server or Click Here to download v1.2.2 from our GitHub repository.
Known routing issues: Some users do encounter routing issues from VPN connections from once in a while. With this in mind, if you encounter any connection problems after installing the VPN Software, by all means please come over to our Live Help service and one of our expert team will assist you in resolving the issue. For this reason, in order to minimise the possibility of routing issues its important that you always run the VPNUK software with admin permissions..
Screencast Tutorial
1. Setup VPNUK – Download VPNUK Software
You can download and setup VPNUK from the following link. Additionally, we have a .exe and a .zip version available for download.
Click here to download the latest version (1.2.2) of our app from our server or Click Here to download v1.2.2 from our GitHub repository.
If you have any problems downloading or installing files from our server or from our github repository please contact our Live Help team. In case of any problems we are always available to help. Alternative download mirrors are available on our downloads page here.
![]()
2. Setup VPNUK – SmartScreen Prompt
You may receive a Windows SmartScreen or User Account Control prompt during installation. In this situation, click ‘Yes’ or ‘Run Anyway’. The VPNUK software is verified, secure and perfectly safe to use. By all means, you can click onto ‘Show Details’ to view our security certificate information.

3. Setup VPNUK – Start Installation
To begin with, run the installer application.

4. Setup VPNUK – Location
Click ‘Next’ to confirm the installation location.

5. Setup VPNUK – OpenVPN Version
We always recommend using the most recent version of OpenVPN, if you already have OpenVPN installed on your computer, our software installer will prompt you to update to the latest version, if its out of date.

6. Setup VPNUK – Finish Installation
Once all files have been downloaded and installed click ‘Finish’ to close the setup.

Configuring the VPNUK connection
7. Run the VPNUK software
You will have a desktop shortcut and a VPNUK Start menu item. Click onto the VPNUK icon to run the software.
![]()
8. Connection Settings
Click onto the ‘Settings’ icon.

9. Connection Type
VPNUK Software currently allows a connection through the following connections types OpenVPN, IKEv2, L2TP/IPSec and PPTP.

10. Create Profile
You can add unlimited connection profiles to the VPNUK software, this will save your connection settings and server details which will then ensure the connection process is very easy from the quick launch screen later. Type a name for your connection in the upper Profile text area and then click onto ‘Create’, that will save your Profile name. If you would like to edit the profile name at a later date you can change it in the lower text area, and you can delete a profile by selecting it and clicking onto the delete button.

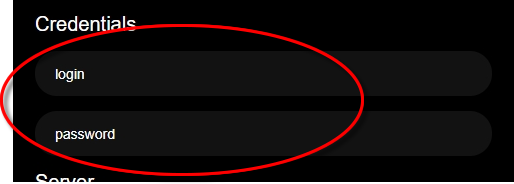
11. Profile Connection Settings – Username & Password
Enter the VPN login username and password for the profile you are creating. You can find your assigned login username and password along with your server information in the members area of our website. Click onto VPNUK Account Details from the left hand menu and navigate to the account you would like to configure.
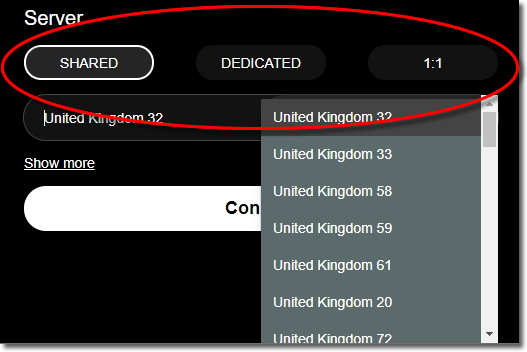
12. Profile Connection Settings – Server
Choose your VPNUK server information. Shared IP account holders can choose any shared IP server. Dedicated IP and 1:1 account holders must select the server the vpn account is located on. Dedicated IP account holders also have unlimited access to the entire Shared IP platform, you can create multiple connection profiles and select any of the Shared IP servers to connect to.
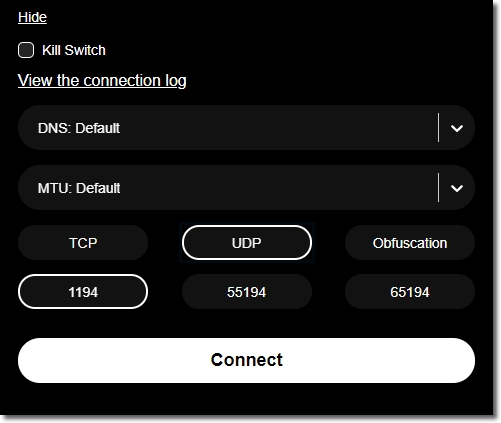
13. Profile Connection Settings – Optional Settings
Kill Switch – Protects your real location from being displayed should your vpn connection fail.
DNS: Routes your VPN connection through a third party DNS provider.
MTU: Changes the default MTU settings which can sometimes help with routing speeds.
Protocol: Choose whether to route your connection through a TCP, UDP or an obfuscated connection.
Port: Choose which port to run your VPN connection through.
14. Connecting for the first time
Click onto the ‘Connect’ button to connect to the VPN account.

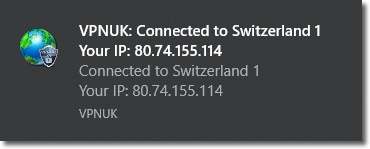
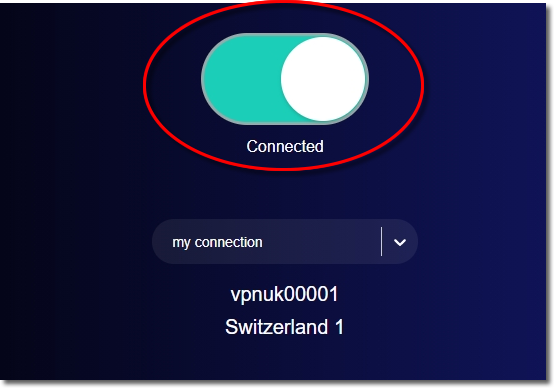
15. Connection Confirmation Details
Once connected to the VPN, you will receive a visual confirmation of your chosen server and your IP address, the system tray icon will also change colour.
Quick Launch Screen
16. Quick Launch Overview.
The Quick Launch screen has been designed to provide you with an easy way to switch between existing profiles and connect to your VPNUK account. You will be presented with a connection toggle button, a profile switcher dropdown selection and a visual confirmation of the current profile that is being used.
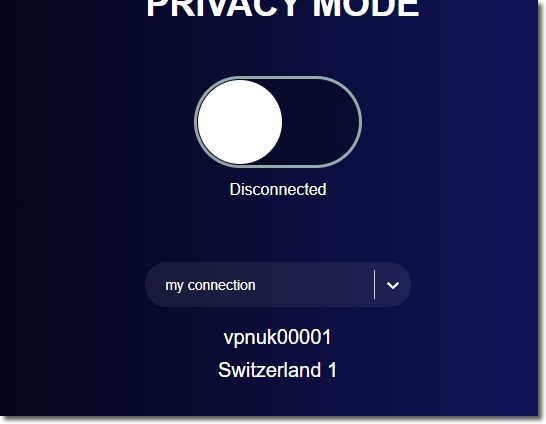
17. Connection Toggle
Once you are happy with the profile selection you can click onto the connection slider to connect to your VPNUK account.
Enjoy Secure VPN Access with the VPNUK App on Windows!
Did this guide help? Please provide us with feedback here or share it with others looking for a secure VPN setup on Windows!